Consultation
Consultation for dermal filler treatment is a crucial first step in achieving your desired aesthetic goals. During this appointment, you’ll have the opportunity to discuss your expectations with a qualified practitioner, who will assess your individual needs and recommend the most suitable treatment plan.
Medical History Review
A thorough medical history review is an essential part of the consultation process. The practitioner will ask about your past medical conditions, allergies, current medications, and any previous cosmetic procedures you’ve had. This information helps them to identify any potential risks or contraindications associated with dermal filler treatment.
They may also inquire about your lifestyle habits, including smoking and alcohol consumption, as these can affect the healing process and the longevity of the results.
Be honest and open during this part of the consultation, as providing accurate information is crucial for ensuring a safe and effective treatment.
Treatment Goals Discussion
During your consultation, you’ll have the opportunity to discuss your aesthetic goals in detail. Be prepared to describe the areas you want to enhance or modify, and show pictures of desired results if you have them. This open communication allows the practitioner to understand your vision and suggest suitable filler types, placement techniques, and expected outcomes.
The practitioner will also discuss treatment goals, outlining what can realistically be achieved with dermal fillers. They’ll explain the potential benefits, limitations, and risks associated with the chosen treatment plan. It’s essential to have a clear understanding of these aspects before proceeding with the procedure.
Injection Area Examination
Following your consultation discussion, the practitioner will examine the area(s) you wish to treat. This involves visually assessing the contours, identifying any areas requiring volumization or correction, and determining the appropriate amount and type of filler needed.
They might use a ruler to measure specific facial features or mark potential injection sites with a pen.
The practitioner will explain their findings and discuss the proposed treatment plan in detail, answering any questions you may have before proceeding.
Product Selection
Consultation for dermal filler treatment is a crucial first step in achieving your desired aesthetic goals. During this appointment, you’ll have the opportunity to discuss your expectations with a qualified practitioner, who will assess your individual needs and recommend the most suitable treatment plan.
A thorough medical history review is an essential part of the consultation process. The practitioner will ask about your past medical conditions, allergies, current medications, and any previous cosmetic procedures you’ve had. This information helps them to identify any potential risks or contraindications associated with dermal filler treatment.

They may also inquire about your lifestyle habits, including smoking and alcohol consumption, as these can affect the healing process and the longevity of the results.
Be honest and open during this part of the consultation, as providing accurate information is crucial for ensuring a safe and effective treatment.
During your consultation, you’ll have the opportunity to discuss your aesthetic goals in detail. Be prepared to describe the areas you want to enhance or modify, and show pictures of desired results if you have them. This open communication allows the practitioner to understand your vision and suggest suitable filler types, placement techniques, and expected outcomes.
The practitioner will also discuss treatment goals, outlining what can realistically be achieved with dermal fillers. They’ll explain the potential benefits, limitations, and risks associated with the chosen treatment plan. It’s essential to have a clear understanding of these aspects before proceeding with the procedure.
Following your consultation discussion, the practitioner will examine the area(s) you wish to treat. This involves visually assessing the contours, identifying any areas requiring volumization or correction, and determining the appropriate amount and type of filler needed.
They might use a ruler to measure specific facial features or mark potential injection sites with a pen.
The practitioner will explain their findings and discuss the proposed treatment plan in detail, answering any questions you may have before proceeding.
Preparation for Treatment
Before your dermal filler appointment in the UK, preparation is key to ensure a smooth and successful experience. Your journey begins with a consultation where you’ll meet with a qualified practitioner to discuss your desired aesthetic outcomes.
Skin Cleansing
To prepare for your dermal filler treatment, begin by cleansing your skin thoroughly on the day of the appointment. Avoid using any harsh products or scrubs that could irritate the skin.
It’s also recommended to avoid consuming alcohol and caffeine in the hours leading up to the treatment as they can thin the blood and increase the risk of bruising.
Local Anesthesia Administration
Local anesthesia is typically administered prior to dermal filler injection to minimize discomfort during the procedure. The practitioner will cleanse the injection site and then apply a topical anesthetic cream or solution. This helps numb the area, reducing any pain or sensitivity during the injections.
It’s normal to experience mild stinging or pressure sensations as the anesthetic takes effect.
Once the area is sufficiently numb, the practitioner will proceed with injecting the dermal filler using a fine needle. They will carefully place the filler at specific points to achieve the desired aesthetic outcome.
The entire procedure generally takes around 30 minutes to an hour, depending on the areas being treated and the amount of filler used.
Treatment Procedure
Before your dermal filler appointment in the UK, preparation is key to ensure a smooth and successful experience. Your journey begins with a consultation where you’ll meet with a qualified practitioner to discuss your desired aesthetic outcomes.
To prepare for your dermal filler treatment, begin by cleansing your skin thoroughly on the day of the appointment. Avoid using any harsh products or scrubs that could irritate the skin.
It’s also recommended to avoid consuming alcohol and caffeine in the hours leading up to the treatment as they can thin the blood and increase the risk of bruising.
Local anesthesia is typically administered prior to dermal filler injection to minimize discomfort during the procedure. The practitioner will cleanse the injection site and then apply a topical anesthetic cream or solution. This helps numb the area, reducing any pain or sensitivity during the injections.
It’s normal to experience mild stinging or pressure sensations as the anesthetic takes effect.
Once the area is sufficiently numb, the practitioner will proceed with injecting the dermal filler using a fine needle. They will carefully place the filler at specific points to achieve the desired aesthetic outcome.
The entire procedure generally takes around 30 minutes to an hour, depending on the areas being treated and the amount of filler used.
Needle Insertion
Local anesthesia is typically administered prior to dermal filler injection to minimize discomfort during the procedure. The practitioner will cleanse the injection site and then apply a topical anesthetic cream or solution. This helps numb the area, reducing any pain or sensitivity during the injections. It’s normal to experience mild stinging or pressure sensations as the anesthetic takes effect.
Once the area is sufficiently numb, the practitioner will proceed with injecting the dermal filler using a fine needle. They will carefully place the filler at specific points to achieve the desired aesthetic outcome.
Filler Injection
Following your consultation discussion, the practitioner will examine the area(s) you wish to treat. This involves visually assessing the contours, identifying any areas requiring volumization or correction, and determining the appropriate amount and type of filler needed. They might use a ruler to measure specific facial features or mark potential injection sites with a pen.
The practitioner will explain their findings and discuss the proposed treatment plan in detail, answering any questions you may have before proceeding.
Before your dermal filler appointment in the UK, preparation is key to ensure a smooth and successful experience. Your journey begins with a consultation where you’ll meet with a qualified practitioner to discuss your desired aesthetic outcomes.
To prepare for your dermal filler treatment, begin by cleansing your skin thoroughly on the day of the appointment. Avoid using any harsh products or scrubs that could irritate the skin.
It’s also recommended to avoid consuming alcohol and caffeine in the hours leading up to the treatment as they can thin the blood and increase the risk of bruising.
Local anesthesia is typically administered prior to dermal filler injection to minimize discomfort during the procedure. The practitioner will cleanse the injection site and then apply a topical anesthetic cream or solution. This helps numb the area, reducing any pain or sensitivity during the injections.
It’s normal to experience mild stinging or pressure sensations as the anesthetic takes effect.
Once the area is sufficiently numb, the practitioner will proceed with injecting the dermal filler using a fine needle. They will carefully place the filler at specific points to achieve the desired aesthetic outcome. The entire procedure generally takes around 30 minutes to an hour, depending on the areas being treated and the amount of filler used.
Massage and Assessment
During your consultation, you’ll have the opportunity to discuss your aesthetic goals in detail. Be prepared to describe the areas you want to enhance or modify, and show pictures of desired results if you have them. This open communication allows the practitioner to understand your vision and suggest suitable filler types, placement techniques, and expected outcomes.
The practitioner will also discuss treatment goals, outlining what can realistically be achieved with dermal fillers. They’ll explain the potential benefits, limitations, and risks associated with the chosen treatment plan. It’s essential to have a clear understanding of these aspects before proceeding with the procedure.
Following your consultation discussion, the practitioner will examine the area(s) you wish to treat. This involves visually assessing the contours, identifying any areas requiring volumization or correction, and determining the appropriate amount and type of filler needed.
They might use a ruler to measure specific facial features or mark potential injection sites with a pen.
The practitioner will explain their findings and discuss the proposed treatment plan in detail, answering any questions you may have before proceeding.
Treatment Procedure:
Local anesthesia is typically administered prior to dermal filler injection to minimize discomfort during the procedure. The practitioner will cleanse the injection site and then apply a topical anesthetic cream or solution. This helps numb the area, reducing any pain or sensitivity during the injections.
It’s normal to experience mild stinging or pressure sensations as the anesthetic takes effect.
Once the area is sufficiently numb, the practitioner will proceed with injecting the dermal filler using a fine needle. They will carefully place the filler at specific points to achieve the desired aesthetic outcome.
The entire procedure generally takes around 30 minutes to an hour, depending on the areas being treated and the amount of filler used.
Massage:
After treatment, your practitioner may recommend gentle massage techniques to help distribute the filler evenly and promote better integration. They will advise on the appropriate duration and frequency for these massages.
Assessment:
Your practitioner will assess your results at regular intervals after your treatment, ensuring optimal outcomes and addressing any concerns or adjustments that may be needed.
Aftercare Instructions
Aftercare instructions are crucial to ensure the best possible outcome from your dermal filler treatment. They will outline steps you need to take in the days and weeks following your appointment to minimize bruising, swelling, and ensure the filler settles correctly.
Ice Application
Applying ice to the treated area can help reduce swelling and inflammation after your dermal filler appointment. Apply an ice pack wrapped in a thin towel to the injection site for 10-15 minutes at a time, several times a day, especially during the first 24-48 hours post-treatment.
Remember to avoid direct contact between the ice and your skin, as this can cause irritation.
Elevating the treated area can also help minimize swelling. This is particularly useful if you’ve had filler in your cheeks or under the eyes.
Avoidance of Certain Activities
Aftercare instructions are crucial to ensure the best possible outcome from your dermal filler treatment. They will outline steps you need to take in the days and weeks following your appointment to minimize bruising, swelling, and ensure the filler settles correctly.
Avoid strenuous activities like intense exercise or heavy lifting for at least a few days after the procedure, as this can increase blood flow and potentially lead to more bruising or swelling.
You should also avoid touching or rubbing the treated area excessively, as this can disrupt the filler placement and potentially cause lumps or bumps.
Refrain from applying makeup or skincare products directly to the injection site for at least 24 hours after treatment. Allow the area to heal properly before resuming your regular skincare routine.
It’s essential to avoid facial massages, particularly vigorous ones, for a few days following the treatment as this can displace the filler.
Additionally, abstain from using products containing retinol, acids (such as glycolic or salicylic acid), or other potentially irritating ingredients on the treated area for at least a week.
It’s also crucial to protect your skin from the sun by wearing sunscreen with an SPF of 30 or higher daily, even on cloudy days. UV exposure can degrade the filler and affect its longevity.
Avoid extreme temperatures, such as saunas, hot tubs, or steam rooms, for at least a few days after treatment as heat can increase blood flow and potentially lead to swelling.
If you experience any unusual symptoms, such as severe pain, redness, or infection, contact your practitioner immediately.
Swelling Management
Aftercare instructions are crucial to ensure the best possible outcome from your dermal filler treatment. They will outline steps you need to take in the days and weeks following your appointment to minimize bruising, swelling, and ensure the filler settles correctly.
Applying ice to the treated area can help reduce swelling and inflammation after your dermal filler appointment. Apply an ice pack wrapped in a thin towel to the injection site for 10-15 minutes at a time, several times a day, especially during the first 24-48 hours post-treatment. Remember to avoid direct contact between the ice and your skin, as this can cause irritation. Elevating the treated area can also help minimize swelling. This is particularly useful if you’ve had filler in your cheeks or under the eyes.
Avoid strenuous activities like intense exercise or heavy lifting for at least a few days after the procedure, as this can increase blood flow and potentially lead to more bruising or swelling. You should also avoid touching or rubbing the treated area excessively, as this can disrupt the filler placement and potentially cause lumps or bumps.
Refrain from applying makeup or skincare products directly to the injection site for at least 24 hours after treatment. Allow the area to heal properly before resuming your regular skincare routine. It’s essential to avoid facial massages, particularly vigorous ones, for a few days following the treatment as this can displace the filler.
Additionally, abstain from using products containing retinol, acids (such as glycolic or salicylic acid), or other potentially irritating ingredients on the treated area for at least a week.
It’s also crucial to protect your skin from the sun by wearing sunscreen with an SPF of 30 or higher daily, even on cloudy days. UV exposure can degrade the filler and affect its longevity. Avoid extreme temperatures, such as saunas, hot tubs, or steam rooms, for at least a few days after treatment as heat can increase blood flow and potentially lead to swelling.
If you experience any unusual symptoms, such as severe pain, redness, or infection, contact your practitioner immediately.
Follow-up Appointments
Aftercare instructions are crucial for optimal results from your dermal filler treatment. They will outline steps to minimize bruising, swelling, and ensure the filler settles correctly.
Applying ice packs wrapped in a thin towel to the treated area for 10-15 minutes at a time, several times a day, especially in the first 24-48 hours, can help reduce swelling. Remember not to apply ice directly to your skin. Elevating the treated area, particularly if filler was placed in your cheeks or under the eyes, can also minimize swelling.
For a few days after treatment, avoid strenuous activities like intense exercise or heavy lifting, as these can increase blood flow and potentially cause more bruising or swelling. Avoid touching or rubbing the treated area excessively to prevent disrupting the filler placement. Don’t apply makeup or skincare products directly to the injection site for at least 24 hours, allowing the area to heal properly before resuming your usual routine.
Facial massages, especially vigorous ones, should be avoided for a few days as they can displace the filler. Also, refrain from using products containing retinol, acids (like glycolic or salicylic acid), or other potentially irritating ingredients on the treated area for at least a week.
Sun protection is essential! Wear sunscreen with an SPF of 30 or higher daily, even on cloudy days. UV exposure can break down filler and affect its longevity. Avoid extreme temperatures like saunas, hot tubs, or steam rooms for a few days post-treatment as heat can increase blood flow and potentially lead to swelling.
If you experience any unusual symptoms such as severe pain, redness, or infection, contact your practitioner immediately.
Follow-up appointments are typically scheduled a few weeks after the initial treatment. These appointments allow your practitioner to assess the results, make any necessary adjustments, and ensure your overall satisfaction with the outcome. They will check for any signs of complications and discuss any questions or concerns you may have.
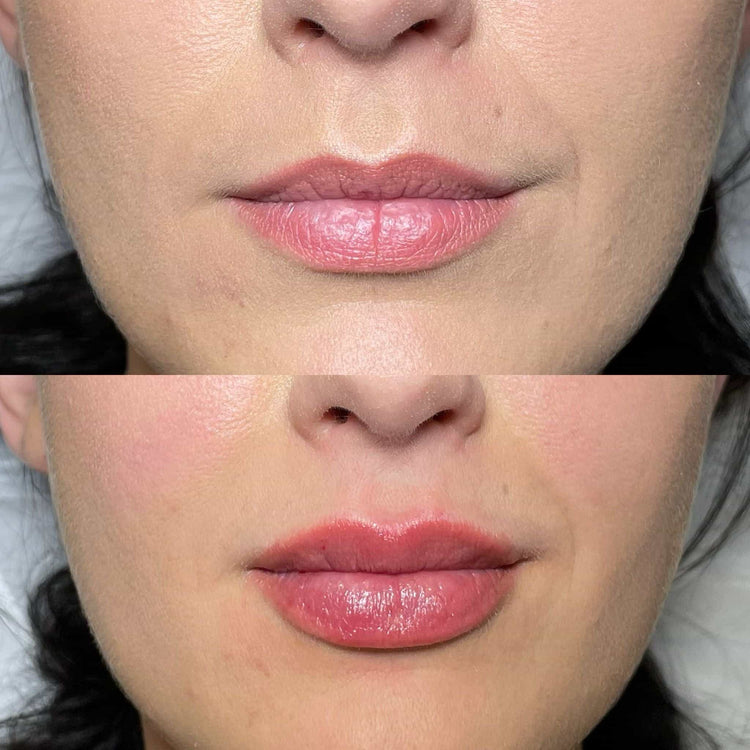
Book your consultation to enhance your facial contours with dermal fillers at It’s Me & You Clinic
- How To Use Skincare Consultations To Achieve Younger-looking Skin - September 29, 2025
- Gummy Smile Treatment – Gum Contouring Near Kenley, Surrey - September 28, 2025
- Filler For Recessed Chin In Staines-upon-Thames, Surrey - September 27, 2025